 Growing your own potatoes can be a rewarding and delicious experience. Whether you're an experienced gardener or just starting out, there are some key steps to follow to ensure a successful crop. In this article, we'll cover everything you need to know, from selecting the right potato varieties to curing and storing your potatoes for long-term use. Let's get started!
Selecting the Right Potato Varieties for Your Garden
When it comes to selecting the right potato varieties for your garden, there are a few factors to consider. First, you'll want to choose varieties that are well-suited to your climate and growing conditions. Some varieties are better suited to hot, dry climates, while others thrive in cooler, wetter conditions. You'll also want to consider the size and texture of the potatoes you're looking to grow. Some varieties are better for baking or mashing, while others are ideal for making potato chips or French fries.
Preparing the Soil for Planting Potatoes
Potatoes prefer well-drained, fertile soil. To prepare your soil for planting, start by clearing away any weeds or debris. Then, loosen the soil to a depth of at least 8 inches, and mix in some compost or other organic matter to improve soil fertility. Be sure to break up any large clumps of soil, as this will make it easier for your potatoes to grow and expand.
Planting Potatoes: Tips and Tricks for Success
When it comes to planting potatoes, timing is key. You'll want to plant your potatoes in the early spring, as soon as the soil has thawed and is workable. Start by digging trenches that are about 6 inches deep and 12 inches apart. Place your seed potatoes (which are simply small, whole potatoes) in the trenches, with the eyes facing up. Cover the potatoes with soil, and water well. As your potato plants begin to grow, be sure to keep them well-watered and weed-free.
Watering and Fertilizing Potatoes
Throughout the Growing Season Potatoes need plenty of water to grow and produce a healthy crop. Be sure to water your potato plants deeply at least once a week, or more often during hot, dry weather. You can also fertilize your potatoes with a balanced fertilizer, or by side-dressing with compost or other organic matter. Be sure to follow the manufacturer's instructions when using any commercial fertilizers.
How to Deal with Common Potato Pests and Diseases
Potatoes are vulnerable to a variety of pests and diseases, including potato beetles, aphids, and blight. To prevent infestations, be sure to rotate your potato crops every year, and avoid planting potatoes in the same spot for more than two years in a row. If you do notice signs of pests or diseases, be sure to treat your plants immediately with an appropriate organic or chemical pesticide.
Hilling or Earthing up Potatoes for Maximum Yields
Hilling, or earthing up, is a technique used to increase the yield of your potato plants. As your plants begin to grow, mound up soil around the base of the plants, leaving just a few inches of the leaves exposed. This will encourage the plants to produce more tubers, and will also help to keep the potatoes from turning green and becoming toxic.
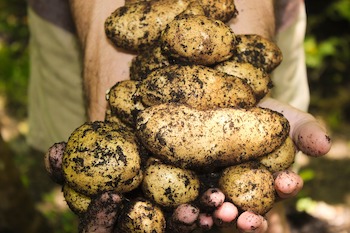
Harvesting Potatoes: When and How to Do It
Potatoes are usually ready to harvest in the late summer or early fall, once the leaves have started to turn yellow and die back. To harvest your potatoes, simply use a garden fork or shovel to gently dig up the plants. Be sure to handle the potatoes carefully, as they are easily bruised or damaged. Allow your potatoes to dry in a cool, dry place for a few days before storing or using.
Curing and Storing Potatoes for Long-Term Use
Once you've harvested your potatoes, it's important to cure them before storing them for long-term use. Curing allows the potatoes to develop a thick skin, which helps to protect them during storage. To cure your potatoes, spread them out in a cool, dark, well-ventilated space, such as a garage or basement. Be sure to keep them away from light and heat sources. Allow your potatoes to cure for two to three weeks, or until the skin has thickened and the potatoes are dry to the touch.
After your potatoes have cured, you can store them in a cool, dry place. A root cellar or cool basement is ideal. Be sure to keep your potatoes in a dark place, as exposure to light can cause them to turn green and become toxic. You can store your potatoes in a burlap sack, a paper bag, or in a well-ventilated container. Be sure to check your potatoes periodically for signs of rot or spoilage, and remove any damaged potatoes immediately.
Saving Seed Potatoes for Next Year's Crop
If you want to grow potatoes again next year, you'll need to save some of your harvest as seed potatoes. Seed potatoes are simply small potatoes that are saved specifically for planting the following year. To save seed potatoes, choose a few healthy, disease-free potatoes from your harvest, and set them aside in a cool, dark place. Be sure to label them so that you know which variety they are. In the spring, simply plant your seed potatoes as you would any other potato.
Creative Ways to Cook and Enjoy Your Home-Grown Potatoes
Home-grown potatoes are a delicious and versatile ingredient that can be used in a variety of recipes. From classic baked potatoes to crispy potato chips, there are countless ways to enjoy your harvest. One simple but delicious way to prepare potatoes is to roast them with herbs and spices. Simply toss your potatoes with olive oil, garlic, rosemary, and sea salt, and roast them in the oven until crispy and golden brown.
Another creative way to use your potatoes is to make homemade potato gnocchi. This Italian dish is made with potatoes, flour, and eggs, and is a delicious way to showcase the flavor of your home-grown potatoes. You can also use your potatoes to make classic dishes like potato salad, mashed potatoes, and scalloped potatoes. The possibilities are endless!